react-hook-form
react-hook-form是一个用于react表单校验的库。
很多UI框架(如antd、element-ui等)中的表单组件已经内置了它的部分功能,包括数据收集、字段校验、数值转化等。
不同于这些带UI的表单组件,react-hook-form完全脱离UI,仅关注数据流间的运算逻辑, 这意味着你可以在任何react场景使用它,在其它UI框架甚至根本不使用UI框架的场景下这尤为重要。 https://reacthookform.caitouyun.com/zh/get-started#Quickstart
受控组件与非受控组件
在开始介绍 React Hook Form 前,咱们先了解一下 受控组件 与 非受控组件 的概念。
受控组件
先说说受控组件,以 input 为例:
const [value,setValue] = useState('')

<input value={value} onChange={(e)=> setValue(e.target.value)} />在上面的代码中,我们通过通过自己维护一个 state 来获取或更新 input 输入的值,以这种方式控制取值的 表单输入元素 就叫做 受控组件。
非受控组件
那么什么是非受控组件呢?在 React 中,非受控组件是指表单元素的值由 DOM 节点直接处理,而不是由 React 组件来管理。如下例:
import React, { useRef } from 'react';

function UncontrolledForm() {
	const nameInputRef = useRef(null);
	const emailInputRef = useRef(null);
	const passwordInputRef = useRef(null);

	function handleSubmit(event) {
		console.log('Name:', nameInputRef.current.value);
		console.log('Email:', emailInputRef.current.value);
		console.log('Password:', passwordInputRef.current.value);
		event.preventDefault();
	}

	return (
		<form onSubmit={handleSubmit}>
			<label>
				Name:
				<input type="text" ref={nameInputRef} />
			</label>
			<label>
				Email:
				<input type="email" ref={emailInputRef} />
			</label>
			<label>
				Password:
				<input type="password" ref={passwordInputRef} />
			</label>
			<button type="submit">Submit</button>
		</form>
	);
}在这个例子中,我们使用 useRef Hook 创建了一个 ref 对象,并将其赋值给每个 input 元素的 ref 属性。
在 handleSubmit 函数中,我们使用 ref.current.value 来获取每个 input 元素的值。
这里的每个input 元素都是非受控组件,因为它们的值由 DOM 节点直接处理,而不是由 React 组件来管理。
当然,这意味着当用户输入数据时,React 无法追踪表单元素的值。
因此,当您需要访问表单元素的值时,您需要使用DOM API来获取它们。
提示
为什么需要非受控组件?
在 React 中,通常使用受控组件来处理表单。 受控组件表单元素的值由 React 组件来管理,当表单数据发生变化时,React 会自动更新组件状态,并重新渲染组件。 这种方式可以使得表单处理更加可靠和方便,也可以使得表单数据和应用状态之间保持一致。
但在实际的开发中,表单往往是最复杂的场景,有的表单有数十个字段,如果使用受控组件去构建表单,那么我们就需要维护大量 state,且 React 又不像 Vue 可以通过双向绑定直接修改 state 的值,每一个表单字段还需要定义一下 onChange 方法。 因此在维护复杂表单时,使用受控组件会有很大的额外代码量。
为了解决受控组件带来的问题,我们可以使用非受控组件来构建表单。
受控组件主要有以下三个优点:
- 可以减少组件的 代码量和复杂度,因为非受控组件不需要在组件状态中保存表单数据。
- 可以更好地 处理大量表单数据,因为非受控组件可以让您直接操作DOM元素,而不需要将所有表单数据存储在组件状态中。
- 可以更容易地与第三方 JavaScript 库和表单处理代码集成,因为非受控组件使您能够使用 DOM API 或 ref 直接访问表单元素,而不是在 React 中重新实现所有的表单处理逻辑。
在看文档的时候,建议的顺序:
官方的 Get Started 文档 useForm, register, useController useForm 下有很多的方法,都在 form context 可以获取,可以直接调用; 尤其 getValues, trigger, setValue, handleSubmit 等方法较为重要
注意事项 HookForm props 中的 mode 与 reValidateMode Hooks: useWatch, useControl 与 useFormState 的差异 Controll 中的 unRegister Methods: trigger, reset, resetField
最佳实践 尽可能减少额外的 useState 与 formState 混用; 在有较细颗粒度控制时,建议在 HookForm 之外直接 useForm 来获取 form 对象,再传入到 HookForm.props.form 中; 有较为复杂的校验逻辑的时候,用 yup 之类的校验库配合使用效率更高;
高性能原理 react-hook-form 采纳不受控表单输入组件的方案,实现了:
编辑组件时没有任何 onChange 之外的事件触发 register field 过程仅监听 onChange / onBlur, 且 onChange 过程才获取 name 仅绑定过程中有一次 render
useForm
useForm是一个用于管理表单的自定义hook,它接收一个配置对象作为入参。
import { useForm } from "react-hook-form";

interface FormData {
	email: string;
	password: string;
}

export function Form() {
	const {
		register,
		handleSubmit,
		reset,
		formState: { errors },
	} = useForm<FormData>({
		defaultValues: {
			email: "",
			password: "",
		},
		reValidateMode: "onChange",
	});

	const onSubmit = (data: FormData) => {
		console.log(data);
	};
	const onReset = () => reset();

	return (
		<form action="#" onSubmit={handleSubmit(onSubmit)} onReset={onReset}>
			<input type="email" {...register("email")} />
			{errors.email && <p>{errors.email.message}</p>}
			<input type="password" {...register("password")} />
			{errors.password && <p>{errors.password.message}</p>}
			<input type="submit" value="submit" />
			<input type="reset" value="reset" />
		</form>
	);
}常用的配置项有:
显示代码
//useForm的使用
import { useForm } from 'react-hook-form'

const form = useForm() //useForm中可以为空,也可以是一个object(关于form的数据)

//useForm对象的一些默认值
useForm({
	mode: 'onSubmit', //验证事件的触发时间
	reValidateMode: 'onChange',
	defaultValues: {},//form表单的默认值
	resolver: undefined,//允许使用任何外部验证库
	context: undefined,
	criteriaMode: "firstError",//"firstError,all"收集错误
	shouldFocusError: true,//当为true的时候,当用户提交了一个验证失败的表单的时候,他会将焦点设置在第一个有错误的字段上面
	shouldUnregister: false,//默认情况下,删除输入的时候将保留默认值。设置为true,在卸载期间注销输入。
	shouldUseNativeValidation: false,//启用浏览器本机验证
	delayError: undefined //以毫秒为单位 延迟向最终用户显示错误状态
})

//useForm的一些方法
const {
	getValues,//拿到form的数据
	setValue,//设置form的数据
	register,
	unregister,
	formState,
	watch,//监视指定的输入,并返回其值
	handleSubmit,//处理提交
	reset,//重置整个表单状态,字段引用和订阅
	resetField,//重置单个字段状态
	setError,//手动设置错误
	clearErrors,//清楚设置的错误
	setFocus,//设置焦点
	getFieldState,//重置单个字段状态
	trigger,//手动触发校验
	control//包含将组件注册到React Hook Form中的方法
} = useForm()reValidateMode的设置
reValidateMode用于设置第二次及以后的验证时机。 默认情况下,单击登录按钮后进行验证,之后每次输入都会触发验证。 您可以使用reValidateMode来设置第二次验证的时机,默认值是”onChange”,但也可以更改为”onBlur”或”onSubmit”。
手动验证
可以使用触发器手动完成验证,触发器是 useForm 返回的对象的属性之一。
 const { register, handleSubmit, formState: { errors }, trigger } = useForm<FormData>({
	criteriaMode: 'all',
	defaultValues: {
		email: '243425345@qq.com',
		password: '1233444'
	},
});
// 略
<div>
	<button type="submit">登录</button>
	<button type="button" onClick={() => trigger()}>验证</button>
</div>reset 重新设置
通过使用reset函数,你可以重置表单中输入的值以及formState中包含的属性值。
要添加重置按钮,并在单击按钮时执行reset函数以确认formState的属性如何变化。reset函数的参数指定了每个字段的值在重置后应设置为什么值。 https://www.bmabk.com/index.php/post/224471.html
register
useForm返回的register用于在对应的表单中注册字段(支持校验、嵌套字段、数组字段)。
它返回一个包含以下四个属性的对象: 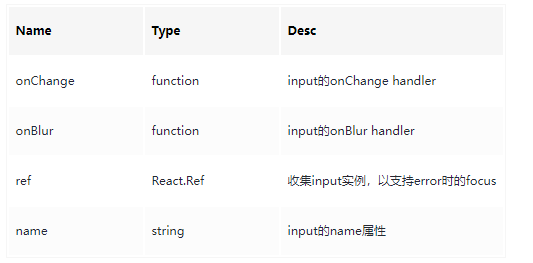
register通过它返回的对象接管了对input身上props(仅以上四个)的操作, 这使得在大部分input(除checkbox、radio、file、submit、image、reset、button外)、select和textarea中,它都能像上例中情况一样直接使用。
自定义组件(尤其是props与register返回的对象不能对应的),则往往不适用。
useController
在不支持直接使用register的情况下,改为使用useController接管组件。
它返回一个包含以下三个属性的对象: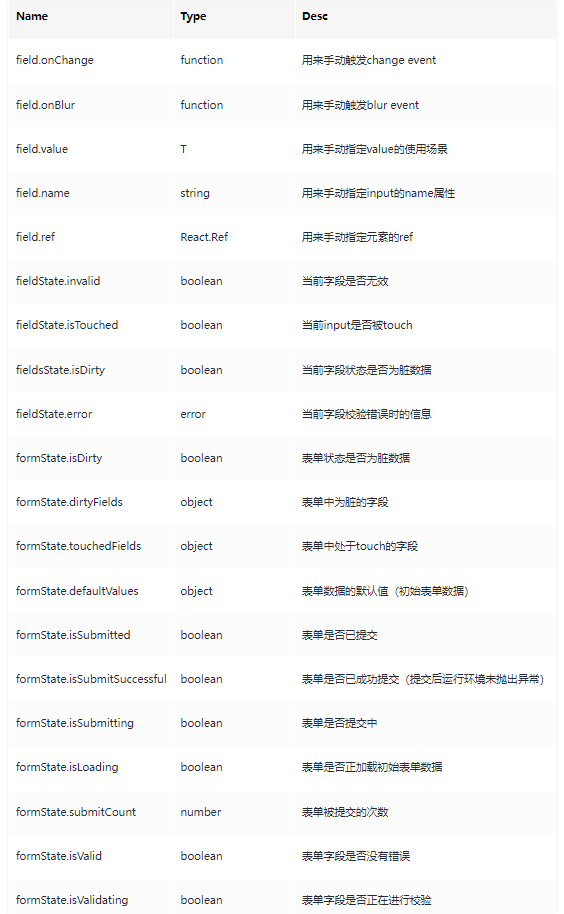
它的使用方式与register稍有不同。
import React from "react";
import { Control, useController, useForm } from "react-hook-form";

interface FieldsValue {
	email: string;
	password: string;
	checkbox: boolean;
}

interface CheckboxProps {
	control: Control<FieldsValue>;
}

type HandleChange = React.ChangeEventHandler<HTMLInputElement>;

export function Checkbox(props: CheckboxProps) {
	const { control } = props;

	const {
		field,
		fieldState: { error },
	} = useController({
		control,
		name: "checkbox",
		rules: { required: { value: true, message: "checkbox required" } },
	});

	const handleChange: HandleChange = (evt) => {
		const value = evt.target.checked;
		field.onChange(value);
	};

	return (
		<div>
			<input
				type="checkbox"
				ref={field.ref}
				checked={field.value}
				onChange={handleChange}
				onBlur={field.onBlur}
				name={field.name}
			/>
			{error && <p>{error.message}</p>}
		</div>
	);
}Controller
Controller组件是useController的组件式API,其作用是useController基本一致。
但使用方法稍有不同:
import { Control, Controller } from "react-hook-form";

interface FieldsValue {
	email: string;
	password: string;
	checkbox: boolean;
	tel: string;
}

interface ItemEmailProps {
	control: Control<FieldsValue>;
}

export function ItemTell(props: ItemEmailProps) {
	const { control } = props;
	return (
		<Controller
			name="tel"
			control={control}
			defaultValue=""
			rules={{ required: "tel is required" }}
			render={({ field, fieldState: { error } }) => {
				return (
					<div>
						<input
							type="tel"
							value={field.value}
							onChange={field.onChange}
							onBlur={field.onBlur}
							ref={field.ref}
							name={field.name}
						/>
						{error && <p>{error.message}</p>}
					</div>
				);
			}}
		></Controller>
	);
}Yup
除内置的校验规则以外,react-hook-form还支持接入Yup这样的库进行校验。
以Yup为例,开始前需安装@hookform/resolvers和yup。
import { yupResolver } from "@hookform/resolvers/yup";
import * as yup from "yup";
import { useForm } from "react-hook-form";

const schema = yup.object({
	date: yup.string().required().min(8).max(18),
});

export function FormAddress() {
	const {
		register,
		handleSubmit,
		formState: { errors },
	} = useForm({
		resolver: yupResolver(schema),

		// Not recommoned
		async defaultValues() {
			return {
				date: "2022-01-01",
			};
		},
	});

	return (
		<form action="#" onSubmit={handleSubmit((d) => console.log(d))}>
			<div>
				<input type="date" {...register("date")} />
				{errors.date && <p>{errors.date?.message}</p>}
			</div>
			<input type="submit" value="submit" />
		</form>
	);
}第三方组件
当需要与第三方UI组件(如、、等)集成时,如果使用register 注册这些第三方UI组件,可能会遇到如无法正确更新表单数据、错误处理、性能差等问题。
因此,使用Controller 是一种更好的解决方案,可以将表单数据与 React Hook Form 状态管理集成在一起,并使用render 函数来直接渲染第三方UI组件。下面放个例子:
import React from "react";
import { Controller, useForm } from "react-hook-form";
import { Button, TextField } from "@material-ui/core";

function ControllerForm() {
	const { control, handleSubmit } = useForm();

	const onSubmit = (data) => console.log(data);

	return (
		<form onSubmit={handleSubmit(onSubmit)}>
			<Controller
				name="firstName"
				control={control}
				defaultValue=""
				rules={{ required: true }}
				render={({ field }) => (
					<TextField label="First Name" {...field} />
				)}
			/>
			<Controller
				name="lastName"
				control={control}
				defaultValue=""
				rules={{ required: true }}
				render={({ field }) => (
					<TextField label="Last Name" {...field} />
				)}
			/>
			<Button type="submit" variant="contained" color="primary">
				Submit
			</Button>
		</form>
	);
}

export default ControllerForm;control 是一个对象,它提供了一些方法和属性,通过使用 control,我们可以将 React Hook Form 中的数据与实际渲染的表单组件进行绑定,从而让 React Hook Form 管理表单中所有的输入和校验逻辑。
field 是 <Controller> 组件通过 render 回调函数传递给其子组件的一个对象,field 对象中包含了一些属性, 如 value、onChange、onBlur 等, 这些属性传递给子组件,用于设置和更新表单控件的值,以及处理表单控件的事件,如用户输入、聚焦、失焦等。
Controller的好处是可以将表单数据和表单状态统一管理,同时避免了对表单数据的手动处理。 此外,它还可以优化表单的渲染性能,并提供更好的错误处理机制,因为它可以自动处理错误消息和验证规则。
表单嵌套(父子组件)
还是一样,先看看示例:
父级表单:
// ParentForm.jsx
import React from "react";
import { FormProvider, useForm } from "react-hook-form";
import ChildForm from "./ChildForm";

function ParentForm() {
	const methods = useForm();
	const { register, handleSubmit, formState: { errors } } = methods;

	const onSubmit = (data) => {
		console.log(data);
	};

	return (
		<FormProvider {...methods}>
			<form onSubmit={handleSubmit(onSubmit)}>
				<h2>Parent Form</h2>
				<label htmlFor="firstName">First Name</label>
				<input {...register("firstName", { required: true })} />
				{errors.firstName && <p>First name is required.</p>}

				<label htmlFor="lastName">Last Name</label>
				<input {...register("lastName", { required: true })} />
				{errors.lastName && <p>Last name is required.</p>}

				<ChildForm />

				<button type="submit">Submit</button>
			</form>
		</FormProvider>
	);
}

export default ParentForm;子级表单:
import React from "react";
import { useFormContext } from "react-hook-form";

function ChildForm() {
	const { register, errors } = useFormContext();

	return (
		<div>
			<h2>Child Form</h2>
			<label htmlFor="childFirstName">Child First Name</label>
			<input {...register("child.firstName", { required: true })} />
			{errors.child?.firstName && <p>Child first name is required.</p>}

			<label htmlFor="childLastName">Child Last Name</label>
			<input {...register("child.lastName", { required: true })} />
			{errors.child?.lastName && <p>Child last name is required.</p>}
		</div>
	);
}

export default ChildForm;分析一下这两个组件的代码:
在 ParentForm 组件中,我们使用 useForm hook 来获取表单的注册函数、表单状态等信息,并使用 FormProvider 组件将其传递给所有的子组件。
在 ChildForm 组件中,我们使用了 useFormContext hook 来获取父表单的注册函数和表单状态。
这里的两个表单组件间并不需要咱们去单独定义 props ,只需要将 useFormContext 与 FormProvider 搭配使用, 就可以将一个嵌套表单的逻辑分离成多个组件进行处理,且可以在父级组件提交时统一获取并处理数据。
FormProvider 是 React Hook Form 提供的一个组件,用于在 React 组件树中向下传递 useForm hook 的实例。
它创建了一个 React Context,并将 useForm hook 的实例作为 Context 的值,然后通过 Context.Provider 组件将这个值传递给所有子组件.
而 useFormContext 则可以在子组件中获取到 FormProvider 提供的 useForm hook 的返回值。 在使用 useFormContext 时,不需要手动使用 Context.Provider 将值传递给子组件,而是可以直接从 useFormContext 中获取,简化嵌套表单的代码逻辑。
条件判断(控制是否显示某一项)
import React from "react";
import { useForm } from "react-hook-form";

function ExampleForm() {
	const { register, handleSubmit, watch } = useForm();
	const onSubmit = (data) => console.log(data);

	return (
		<form onSubmit={handleSubmit(onSubmit)}>

			<label htmlFor="hasAge">Do you have an age?</label>
			<select {...register("hasAge")}>
				<option value="yes">Yes</option>
				<option value="no">No</option>
			</select>

			{watch("hasAge") === "yes" && (
				<>
					<label htmlFor="age">Age</label>
					<input {...register("age", { required: true, min: 18 })} />
					{watch("age") && <p>You must be at least 18 years old.</p>}
				</>
			)}

			<button type="submit">Submit</button>
		</form>
	);
}

export default ExampleForm;我们在 hasAge 输入框上使用了一个简单的条件渲染:只有当用户选择了 "Yes" 时,才会渲染 age 输入框。然后使用 watch 函数来监听输入框的值,并在输入的值小于 18 时显示相应的错误信息。
watch 函数用来监听指定的输入并返回它们的值。在渲染输入值和进行条件渲染时经常用到。
表单列表
import React from "react";
import { useFieldArray, useForm } from "react-hook-form";

function ListForm() {
	const { register, control, handleSubmit } = useForm({
		defaultValues: {
			list: [{ name: "" }, { name: "" }, { name: "" }]
		}
	});

	const { fields, append, remove } = useFieldArray({
		control,
		name: "list"
	});

	const onSubmit = (data) => console.log(data);

	return (
		<form onSubmit={handleSubmit(onSubmit)}>
			{fields.map((field, index) => (
				<div key={field.id}>
					<input
						{...register(`list.${index}.name`, {
							required: "This field is required"
						})}
						defaultValue={field.name}
					/>
					<button type="button" onClick={() => remove(index)}>
						Remove
					</button>
				</div>
			))}
			<button type="button" onClick={() => append({ name: "" })}>
				Add Item
			</button>
			<button type="submit">Submit</button>
		</form>
	);
}

export default ListForm;分析一下上边这段代码:
在这个示例中,我们使用了 useForm 和 useFieldArray hook 来处理一个表单列表。 其中 list 属性是一个包含 3 个空对象的数组。 使用 fields.map 方法遍历 fields 数组,渲染出每一个列表项。 使用 remove 方法为每个列表项添加了一个 "Remove" 按钮,使得用户可以删除不需要的列表项。 我们还使用 append 方法添加了一个 "Add Item" 按钮,可以添加新的列表项。
这段代码的核心就是 useFieldArray,它专门用于处理表单列表的场景,使用时我们将 useForm 返回的 control 传入 useFieldArray hook 中,并为这个列表定义一个名字, hook 会为我们返回一些操作列表的方法,在遍历渲染列表时,我们将每一个子项单独进行注册就可以实现表单列表的动态数据更改了。
需要注意的是,当使用 useFieldArray 处理表单中的数组字段时,每个字段都必须有一个 唯一的 key 值,这样才能正确地进行数组的添加、删除、更新等操作。 如果数组中的字段没有 key 值,useFieldArray 会自动为每个字段生成一个随机的 key 值。
在内部实现上,useFieldArray 使用了 useFormContext 将 FormProvider 提供的 register、unregister 和 setValue 函数传递给了 useFieldArray, 然后在 useFieldArray 内部维护一个数组 state,保存当前的数组值和对数组的操作。
常见问题
要将由Yup库生成的校验规则与react-hook-form结合,并在子组件中使用这些规则,
首先你需要在父组件(App)中通过useForm初始化表单,并设置Yup schema。 然后,你可以利用resolver来处理这些验证规则。下面是如何整合Yup和react-hook-form的一个示例:
首先确保已经安装了 yup 和 @hookform/resolvers 库:
npm install yup @hookform/resolvers接下来,在App组件中引入Yup和对应的resolver,并创建一个Yup schema:
import * as Yup from 'yup';
import { yupResolver } from '@hookform/resolvers/yup';

// 创建Yup Schema
const schema = Yup.object().shape({
	test: Yup.string().required('This field is required'),
});

export default function App() {
	const methods = useForm({
		resolver: yupResolver(schema), // 使用Yup resolver
	});

	const onSubmit = (data) => console.log(data);

	return (
		<FormProvider {...methods}>
			<form onSubmit={methods.handleSubmit(onSubmit)}>
				<NestedInput />
				<input type="submit" />
			</form>
		</FormProvider>
	);
}现在,由于我们已经在顶层设置了验证规则,子组件无需知道具体的验证逻辑,只需注册表单字段即可。react-hook-form 会自动应用Yup提供的验证规则:
function NestedInput() {
	const { register } = useFormContext();

	return <input {...register("test")} />;
}这样,当你尝试提交表单时,如果test 字段为空,将会触发Yup的验证错误,并阻止表单提交,同时错误信息会出现在methods.formState.errors中。
如果你想在子组件中定义并传递具体的校验规则,而不直接在父组件中使用Yup schema,可以采取一种间接的方式——通过props传递规则函数或者规则配置到子组件中。不过请注意,这种方法并不直接利用react-hook-form 与Yup的集成,而是需要在子组件内部手动处理验证逻辑。
以下是一个简化版的例子,展示如何在子组件中接收并应用自定义验证规则:
// 父组件(App)
import React from 'react';
import { useForm, FormProvider, useFormContext } from 'react-hook-form';

function App() {
	const methods = useForm();

	const onSubmit = (data) => console.log(data);

	// 定义一个自定义验证规则(这里只是一个简单的示例,实际可能更复杂)
	const customValidationRules = {
		test: value => {
			if (!value) {
				return 'This field is required';
			}
			// 其他规则...
			return undefined; // 如果验证通过,则返回undefined或null
		},
	};

	return (
		<FormProvider {...methods}>
			<form onSubmit={methods.handleSubmit((data) => {
				const errors = Object.entries(customValidationRules).reduce(
					(acc, [key, rule]) => ({
						...acc,
						...(rule(data[key]) && { [key]: rule(data[key]) }),
					}),
					{}
				);

				if (Object.keys(errors).length === 0) {
					onSubmit(data);
				} else {
					// 处理错误,例如更新表单状态
				}
			})}>
				<CustomInput rules={customValidationRules.test} name="test" />
				<input type="submit" />
			</form>
		</FormProvider>
	);
}

// 子组件(CustomInput)
function CustomInput({ rules, name }) {
	const { register } = useFormContext();

	// 在子组件内部,可以通过props拿到规则并添加到register方法中
	const inputRef = register({ name, validate: rules });

	return <input ref={inputRef} name={name} />;
}在这个例子中,我们在父组件中定义了一个验证规则,并将其作为prop传递给了子组件CustomInput 。子组件在内部接收到这个规则后,将其应用于register函数。
然而,请注意这种方式并不是react-hook-form 推荐的最佳实践,因为框架本身设计就是为了集中管理和执行验证逻辑。如果你依然想在子组件中定义复杂的验证逻辑,建议还是采用Yup或其他验证库与react-hook-form 集成的方式。如果规则相对简单,直接在父组件中管理也是合理的。对于复杂的场景,保持验证逻辑清晰且集中管理通常更为可维护。
一个react hook form 配合antd组件的示例
useForm:核心方法
handleSubmit:接受一个函数,校验全部完成后执行函数?且默认传入form中的数据(name,value)
control:包含组件注册至react-hook-form的方法
useController:主要对第三方UI组件进行包裹,并拿到一些控制所有的方法,属性
name:必须,和key一个道理
trigger:触发表单校验
handleSubmit :直接调用 和写一个<input type = ' submit ' /> 效果一样
import { Button, Input, Modal, message } from 'antd';

import { useController, useForm } from 'react-hook-form';

const CreateConfig = (props) => {
	const { showCreateModal, setShowCreateModal, dispatch } = props;

	const handleCreateModalCancel = () => {
		setShowCreateModal(false);
		message.warning('已取消');
	};
	const CoustomInput = (props) => {
		const { field, fieldState } = useController(props);
		console.log(fieldState.error);
		return (
			<div>
				<Input {...field} placeholder={props.name} />
				{fieldState.error ? <p>{fieldState.error.type}</p> : null}
			</div>
		);
	};
	const { handleSubmit, control, trigger } = useForm({
		defaultValues: {
			inputVal: '',
		},
		mode: 'onBlur',
	});
	console.log('control', control);
	const onSubmit = (data) => {
		console.log(111)
		console.log(data)
	};

	return (
		<Modal
			visible={showCreateModal}
			title="新建清理配置"
			footer={null}
		>
			{/* test */}
			<div>
				<form onSubmit={handleSubmit(onSubmit)}>
					<CoustomInput
						control={control}
						name="inputVal"
						rules={{ required: true, minLength: 6, maxLength: 12 }}
					/>
					<Button onClick={handleCreateModalCancel}>取消</Button>,
					<Button onClick={handleSubmit((d) => console.log(d))}>确定</Button>
				</form>
			</div>
		</Modal>
	);
};

export default CreateConfig;如何创建可访问的输入错误和消息?
React Hook Form 基于不受(父组件)控制的组件,这使您能够轻松构建可访问的自定义表单。
import React, { useEffect } from "react"
import { useForm } from "react-hook-form"


export default function App() {
	const { register, handleSubmit, setValue, setError } = useForm()
	const onSubmit = (data) => console.log(data)


	useEffect(() => {
		register("firstName", { required: true })
		register("lastName")
	}, [])


	return (
		<form onSubmit={handleSubmit(onSubmit)}>
			<input
				name="firstName"
				onChange={(e) => setValue("firstName", e.target.value)}
			/>
			<input
				name="lastName"
				onChange={(e) => {
					const value = e.target.value
					if (value === "test") {
						setError("lastName", "notMatch")
					} else {
						setValue("lastName", e.target.value)
					}
				}}
			/>
			<button>Submit</button>
		</form>
	)
}如何重置表单?
React Hook 表单 API: reset()
React Hook Form reset 的方法将重置所有字段值,并且还会清除表单中的所有 errors 字段值。
如何初始化表单值?
由于 React Hook Form 依赖于不受控制的表单,因此您可以为单个字段指定一个 defaultValue OR defaultChecked 。
但是,更常见的是,建议通过传递 defaultValues 给 useForm 来 初始化表单
function App() {
	const { register, handleSubmit } = useForm({
		defaultValues: {
			firstName: "bill",
			lastName: "luo",
		},
	})


	return (
		<form onSubmit={handleSubmit((data) => console.log(data))}>
			<input {...register("firstName")} />
			<input {...register("lastName")} />
			<button type="submit">Submit</button>
		</form>
	)
}对于异步默认值,可以使用以下方法:
function App() {
	const { register, handleSubmit } = useForm({
		defaultValues: async () => {
			const response = await fetch("/api")
			return await response.json() // return { firstName: '', lastName: '' }
		},
	})
}如何分享ref用法?
React Hook Form 需要 一个 ref 来收集输入值。 但是,您可能希望将其(ref)用于其他目的(例如滚动到视图或焦点)。
import { useImperativeHandle, useRef } from "react"
import { useForm } from "react-hook-form"


interface Inputs {
	firstName: string
	lastName: string
}

export default function App() {
	const { register, handleSubmit } = useForm<Inputs>()
	const firstNameRef = useRef<HTMLInputElement>(null)
	const onSubmit = (data: Inputs) => console.log(data)
	const { ref, ...rest } = register("firstName")
	const onClick = () => {
		firstNameRef.current!.value = ""
	}

	useImperativeHandle(ref, () => firstNameRef.current)

	return (
		<form onSubmit={handleSubmit(onSubmit)}>
			<input {...rest} ref={firstNameRef} />
			<button type="button" onClick={onClick}>
				clear
			</button>
			<button>Submit</button>
		</form>
	)
}如果您无权访问 ref 怎么办?
You can actually register an input without a ref. In fact, you can manually setValue, setError and trigger. 通常,您可以在没有 ref的情况下 register .实际上,您可以手动 setValue 和 setError、 trigger 。
Note: Because ref has not been registered, React Hook Form won't be able to register event listeners to the inputs. This means you will have to manually update value and error. 注意:由于 ref 尚未注册,React Hook Form 将无法将事件侦听器注册到输入。这意味着您将不得不手动更新值和错误。
import React, { useEffect } from "react"
import { useForm } from "react-hook-form"


export default function App() {
	const { register, handleSubmit, setValue, setError } = useForm()
	const onSubmit = (data) => console.log(data)


	useEffect(() => {
		register("firstName", { required: true })
		register("lastName")
	}, [])


	return (
		<form onSubmit={handleSubmit(onSubmit)}>
			<input
				name="firstName"
				onChange={(e) => setValue("firstName", e.target.value)}
			/>
			<input
				name="lastName"
				onChange={(e) => {
					const value = e.target.value
					if (value === "test") {
						setError("lastName", "notMatch")
					} else {
						setValue("lastName", e.target.value)
					}
				}}
			/>
			<button>Submit</button>
		</form>
	)
}为什么第一次按键不起作用?
Make sure you are not using value. The correct property is defaultValue. 确保您没有使用 value .正确的属性是 defaultValue
React Hook Form is focusing on uncontrolled inputs, which means you don't need to change the input value via state via onChange. In fact, you don't need value at all. You only need to set defaultValue for the initial input value.
React Hook Form 专注于不受控制的输入,这意味着你不需要通过 state via onChange 更改输入 value 。 事实上,你根本不需要 value 。您只需要设置 defaultValue 初始输入值。
watch vs getValues vs state
watch: subscribe to either all inputs or a specified input's changes via an event listener and re-render based on which fields are subscribed to.
监视:通过事件侦听器订阅所有输入或指定输入的更改,并根据订阅的字段重新渲染
getValues: get values that are stored inside the custom hook as reference, fast and cheap. This method doesn’t trigger a re-render.
getValues:获取存储在自定义钩子中的值作为参考,快速且便宜。此方法不会触发重新渲染。
local state: React local state represents more than just an input’s state and also decides what to render. This will trigger on each input’s change.
本地状态:React 本地状态不仅代表输入的状态,还决定要渲染的内容。这将在每个输入的更改时触发。
为什么使用三元运算符无法正确更改默认值?
React Hook Form 无法控制你的整个表单和输入,这就是为什么 React 无法识别实际输入已被交换或交换的原因。 作为解决方案,您可以通过为输入提供唯一的 key 属性来解决此问题
import React from "react"
import { useForm } from "react-hook-form"

export default function App() {
	const { register } = useForm()

	return (
		<div>
			{watchChecked ? (
				<input {...register("input3")} key="key1" defaultValue="1" />
			) : (
				<input {...register("input4")} key="key2" defaultValue="2" />
			)}
		</div>
	)
}如何使用Modal或Tab形式?
t's important to understand that React Hook Form embraces native form behavior by storing input state inside each input (except custom register at useEffect). A common misconception is that input state remains with mounted or unmounted inputs. Such as when working with a modal or tab forms. Instead, the correct solution is to build a new form for your form inside each modal or tab and capture your submission data in local or global state and then do something with the combined data. 重要的是要了解 React Hook Form 通过在每个输入中存储输入状态来拥抱原生表单行为(自定义 register 状态 useEffect 除外)。 一个常见的误解是,输入状态仍保留在已挂载或未挂载的输入中。例如,在使用Modal或选项卡窗体时。 相反,正确的解决方案是在每个Modal或选项卡中为表单构建一个新表单,并在本地或全局状态下捕获提交数据,然后对组合的数据执行某些操作。
Advanced Usage 高级用法
Wizard Form / Funnel 向导表单/漏斗
t's pretty common to collect user information through different pages and sections. We recommend using a state management library to store user input through different pages or sections. In this example, we are going to use little state machine as our state management library (you can replace it with redux if you are more familiar with it). 通过不同的页面和部分收集用户信息是很常见的。我们建议使用状态管理库来存储不同页面或部分的用户输入。 在这个例子中,我们将使用 little 状态机作为我们的状态管理库(如果你更熟悉它,可以用 redux 替换它)。
第 1 步:设置route和store。
import { Route, BrowserRouter as Router } from "react-router-dom"
import { StateMachineProvider, createStore } from "little-state-machine"
import Step1 from "./Step1"
import Step2 from "./Step2"
import Result from "./Result"


createStore({
	data: {
		firstName: "",
		lastName: "",
	},
})


export default function App() {
	return (
		<StateMachineProvider>
			<Router>
				<Route exact path="/" component={Step1} />
				<Route path="/step2" component={Step2} />
				<Route path="/result" component={Result} />
			</Router>
		</StateMachineProvider>
	)
}第 2 步:创建您的页面,收集数据并将其提交到store并推送到下一个表单/页面。
import { useForm } from "react-hook-form"
import { withRouter } from "react-router-dom"
import { useStateMachine } from "little-state-machine"
import updateAction from "./updateAction"

const Step1 = (props) => {
	const { register, handleSubmit } = useForm()
	const { actions } = useStateMachine({ updateAction })
	const onSubmit = (data) => {
		actions.updateAction(data)
		props.history.push("./step2")
	}

	return (
		<form onSubmit={handleSubmit(onSubmit)}>
			<input {...register("firstName")} />
			<input {...register("lastName")} />
			<input type="submit" />
		</form>
	)
}

export default withRouter(Step1)第 3 步:使用存储中的所有数据进行最终提交或显示结果数据。
import { useStateMachine } from "little-state-machine"
import updateAction from "./updateAction"

const Result = (props) => {
	const { state } = useStateMachine(updateAction)

	return <pre>{JSON.stringify(state, null, 2)}</pre>
}按照上述模式,您应该能够构建向导表单/漏斗,以从多个页面收集用户输入数据。
Smart Form Component 智能表单组件
这里的想法是,您可以轻松地使用输入来撰写表单。我们将创建一个 Form 组件来自动收集表单数据。
import { Form, Input, Select } from "./Components"

export default function App() {
	const onSubmit = (data) => console.log(data)

	return (
		<Form onSubmit={onSubmit}>
			<Input name="firstName" />
			<Input name="lastName" />
			<Select name="gender" options={["female", "male", "other"]} />


			<Input type="submit" value="Submit" />
		</Form>
	)
}让我们看一下这些组件中的每一个都包含什么。
Form
该 Form 组件的职责是将所有 react-hook-form 方法注入到子组件中。
import React from "react"
import { useForm } from "react-hook-form"

export default function Form({ defaultValues, children, onSubmit }) {
	const methods = useForm({ defaultValues })
	const { handleSubmit } = methods

	return (
		<form onSubmit={handleSubmit(onSubmit)}>
			{React.Children.map(children, (child) => {
				return child.props.name
					? React.createElement(child.type, {
						...{
							...child.props,
							register: methods.register,
							key: child.props.name,
						},
					})
					: child
			})}
		</form>
	)
}Input / Select
这些输入组件的职责是将它们注册到 react-hook-form 中。
import React from "react"

export function Input({ register, name, ...rest }) {
	return <input {...register(name)} {...rest} />
}

export function Select({ register, options, name, ...rest }) {
	return (
		<select {...register(name)} {...rest}>
			{options.map((value) => (
				<option key={value} value={value}>
					{value}
				</option>
			))}
		</select>
	)
}通过将 Form 组件注入 react-hook-form props 子组件,您可以轻松地在应用中创建和编写复杂的表单。
Error Messages 错误消息
错误消息是当用户的输入出现问题时对用户的视觉反馈。React Hook Form 提供了一个 errors 对象,让你轻松检索错误。 有几种不同的方法可以改善屏幕上的错误呈现。
- Register 注册
- 只需通过验证规则对象的 message 属性将错误消息传递给 register ,如下所示
tsx<input {...register('test', { maxLength: { value: 2, message: 'error message' } })} />; - Optional Chaining 可选链接 可选的 ?. 链接运算符允许读取对象, errors 而不必担心由于 null 或 undefined 而导致另一个错误。tsx
errors?.firstName?.message - Lodash get 如果您的项目使用 lodash,则可以利用 lodash get 函数。 例如:tsx
get(errors, 'firstName.message')
Connect Form 连接表单
When we are building forms, there are times when our input lives inside of deeply nested component trees, and that's when FormContext comes in handy. However, we can further improve the Developer Experience by creating a ConnectForm component and leveraging React's renderProps. The benefit is you can connect your input with React Hook Form much easier.
当我们构建表单时,有时我们的输入位于深度嵌套的组件树中,这时 FormContext 就派上用场了。 然而,我们还可以通过创建 ConnectForm 组件并利用 React 的 renderProps 来进一步改善开发人员体验。 这样做的好处是你可以更容易地将你的输入与 React Hook Form 连接起来。
import { FormProvider, useForm, useFormContext } from "react-hook-form"

export const ConnectForm = ({ children }) => {
	const methods = useFormContext()

	return children({ ...methods })
}

export const DeepNest = () => (
	<ConnectForm>
		{({ register }) => <input {...register("deepNestedInput")} />}
	</ConnectForm>
)

export const App = () => {
	const methods = useForm()

	return (
		<FormProvider {...methods}>
			<form>
				<DeepNest />
			</form>
		</FormProvider>
	)
}FormProvider 性能
React Hook Form's FormProvider is built upon React's Context API. It solves the problem where data is passed through the component tree without having to pass props down manually at every level. This also causes the component tree to trigger a re-render when React Hook Form triggers a state update, but we can still optimise our App if required via the example below.
React Hook Form 的 FormProvider 建立在 React 的 Context API 之上。它解决了数据通过组件树传递的问题,而不必在每个级别手动传递道具。 这也会导致组件树在 React Hook Form 触发状态更新时触发重新渲染,但如果需要,我们仍然可以通过下面的示例优化我们的应用程序。
提示
注意:在某些情况下,将 React Hook Form 的 Devtools 与 FormProvider 一起使用可能会导致性能问题。在深入研究性能优化之前,请先考虑此瓶颈。
import React, { memo } from "react"
import { FormProvider, useForm, useFormContext } from "react-hook-form"

// we can use React.memo to prevent re-render except isDirty state changed
const NestedInput = memo(
	({ register, formState: { isDirty } }) => (
		<div>
			<input {...register("test")} />
			{isDirty && <p>This field is dirty</p>}
		</div>
	),
	(prevProps, nextProps) =>
		prevProps.formState.isDirty === nextProps.formState.isDirty
)

export const NestedInputContainer = ({ children }) => {
	const methods = useFormContext()


	return <NestedInput {...methods} />
}

export default function App() {
	const methods = useForm()
	const onSubmit = (data) => console.log(data)
	console.log(methods.formState.isDirty) // make sure formState is read before render to enable the Proxy


	return (
		<FormProvider {...methods}>
			<form onSubmit={methods.handleSubmit(onSubmit)}>
				<NestedInputContainer />
				<input type="submit" />
			</form>
		</FormProvider>
	)
}受控与不受控组件混合
React Hook Form 包含不受控制的组件,但也与受控组件兼容。 大多数 UI 库都构建为仅支持受控组件,例如 MUI 和 Antd。但是使用 React Hook Form,受控组件的重新渲染也得到了优化。 下面是一个将它们与验证相结合的示例。
受控组件
import React, { useEffect } from "react"
import { Input, MenuItem, Select } from "@material-ui/core"
import { Controller, useForm } from "react-hook-form"

const defaultValues = {
	select: "",
	input: "",
}

function App() {
	const { handleSubmit, reset, watch, control, register } = useForm({
		defaultValues,
	})
	const onSubmit = (data) => console.log(data)

	return (
		<form onSubmit={handleSubmit(onSubmit)}>
			<Controller
				render={({ field }) => (
					<Select {...field}>
						<MenuItem value={10}>Ten</MenuItem>
						<MenuItem value={20}>Twenty</MenuItem>
					</Select>
				)}
				control={control}
				name="select"
				defaultValue={10}
			/>

			<Input {...register("input")} />

			<button type="button" onClick={() => reset({ defaultValues })}>
				Reset
			</button>
			<input type="submit" />
		</form>
	)
}自定义注册
import React, { useEffect } from "react"
import { Input, MenuItem, Select } from "@material-ui/core"
import { useForm } from "react-hook-form"


const defaultValues = {
	select: "",
	input: "",
}

function App() {
	const { register, handleSubmit, setValue, reset, watch } = useForm({
		defaultValues,
	})
	const selectValue = watch("select")
	const onSubmit = (data) => console.log(data)

	useEffect(() => {
		register({ name: "select" })
	}, [register])

	const handleChange = (e) => setValue("select", e.target.value)

	return (
		<form onSubmit={handleSubmit(onSubmit)}>
			<Select value={selectValue} onChange={handleChange}>
				<MenuItem value={10}>Ten</MenuItem>
				<MenuItem value={20}>Twenty</MenuItem>
			</Select>
			<Input {...register("input")} />


			<button type="button" onClick={() => reset({ ...defaultValues })}>
				Reset
			</button>
			<input type="submit" />
		</form>
	)
}带解析器的自定义校验钩子
您可以构建自定义钩子作为解析器。自定义钩子可以很容易地与 yup/Joi/Superstruct 集成作为验证方法,并在验证解析器中使用。
Define a memorized validation schema (or define it outside your component if you don't have any dependencies) 定义一个记忆的验证架构(如果没有任何依赖项,则在组件外部定义它)
Use the custom hook, by passing the validation schema 通过传递验证架构,使用自定义挂钩
Pass the validation resolver to the useForm hook 将验证解析程序传递给 useForm 钩子
import React, { useCallback, useMemo } from "react"
import { useForm } from "react-hook-form"
import * as yup from "yup"

const useYupValidationResolver = (validationSchema) =>
	useCallback(
		async (data) => {
			try {
				const values = await validationSchema.validate(data, {
					abortEarly: false,
				})

				return {
					values,
					errors: {},
				}
			} catch (errors) {
				return {
					values: {},
					errors: errors.inner.reduce(
						(allErrors, currentError) => ({
							...allErrors,
							[currentError.path]: {
								type: currentError.type ?? "validation",
								message: currentError.message,
							},
						}),
						{}
					),
				}
			}
		},
		[validationSchema]
	)

const validationSchema = yup.object({
	firstName: yup.string().required("Required"),
	lastName: yup.string().required("Required"),
})

export default function App() {
	const resolver = useYupValidationResolver(validationSchema)
	const { handleSubmit, register } = useForm({ resolver })


	return (
		<form onSubmit={handleSubmit((data) => console.log(data))}>
			<input {...register("firstName")} />
			<input {...register("lastName")} />
			<input type="submit" />
		</form>
	)
}使用虚拟化列表
想象一个场景,你有一个数据表。此表可能包含数百或数千行,每行都有输入。 一种常见的做法是只渲染视口中的项目,但这会导致问题,因为当项目不在视图中并重新添加时,这些项目会从 DOM 中删除。 这将导致项目在重新进入视口时重置为其默认值 下面显示了使用 react-window 的示例。
Form
import React from "react"
import { FormProvider, useForm, useFormContext } from "react-hook-form"
import { VariableSizeList as List } from "react-window"
import AutoSizer from "react-virtualized-auto-sizer"
import ReactDOM from "react-dom"
import "./styles.css"

const items = Array.from(Array(1000).keys()).map((i) => ({
	title: `List ${i}`,
	quantity: Math.floor(Math.random() * 10),
}))

const WindowedRow = React.memo(({ index, style, data }) => {
	const { register } = useFormContext()

	return <input {...register(`${index}.quantity`)} />
})

export const App = () => {
	const onSubmit = (data) => console.log(data)
	const formMethods = useForm({ defaultValues: items })

	return (
		<form className="form" onSubmit={formMethods.handleSubmit(onSubmit)}>
			<FormProvider {...formMethods}>
				<AutoSizer>
					{({ height, width }) => (
						<List
							height={height}
							itemCount={items.length}
							itemSize={() => 100}
							width={width}
							itemData={items}
						>
							{WindowedRow}
						</List>
					)}
				</AutoSizer>
			</FormProvider>
			<button type="submit">Submit</button>
		</form>
	)
}Field Array
import { FixedSizeList } from "react-window"
import { Controller, useFieldArray, useForm } from "react-hook-form"

const items = Array.from(Array(1000).keys()).map((i) => ({
	title: `List ${i}`,
	quantity: Math.floor(Math.random() * 10),
}))

function App() {
	const { control, getValues } = useForm({
		defaultValues: {
			test: items,
		},
	})
	const { fields, remove } = useFieldArray({ control, name: "test" })

	return (
		<FixedSizeList
			width={400}
			height={500}
			itemSize={40}
			itemCount={fields.length}
			itemData={fields}
			itemKey={(i) => fields[i].id}
		>
			{({ style, index, data }) => {
				const defaultValue =
					getValues().test[index].quantity ?? data[index].quantity

				return (
					<form style={style}>
						<Controller
							render={({ field }) => <input {...field} />}
							name={`test[${index}].quantity`}
							defaultValue={defaultValue}
							control={control}
						/>
					</form>
				)
			}}
		</FixedSizeList>
	)
}API
useForm
setError
该功能允许您手动设置一个或多个错误。
Props
name
- input's name
error
{ type: string, message?: string, types: MultipleFieldErrors }- Set an error with its type and message
- 使用其类型和消息设置错误 config
{ shouldFocus?: boolean }- Should focus the input during setting an error. This only works when the input's reference is registered, it will not work for custom register as well.
- 在设置错误时应聚焦输入。这仅在注册了输入的引用时才有效,也不适用于自定义寄存器。
RULES 规则
This method will not persist the associated input error if the input passes register's associated rules.
如果输入传递 register 了关联的规则,则此方法不会保留关联的输入错误
register('registerInput', { minLength: 4 })
setError('registerInput', { type: 'custom', message: 'custom message' });
// validation will pass as long as minLength requirement passAn error that is not associated with an input field will be persisted until cleared with clearErrors. This behaviour is only applicable for built-in validation at field level.
与输入字段无关的错误将一直存在,直到使用 clearErrors 清除为止。此行为仅适用于字段级别的内置验证。
setError("notRegisteredInput", { type: "custom", message: "custom message" })
// clearErrors() need to invoked manually to remove that custom errorYou can set a server or global error with root as the key. This type of error will not persist with each submission.
您可以设置 root 服务器或全局错误作为键。这种类型的错误不会在每次提交时持续存在。
setError("root.serverError", {
	type: "400",
})
setError("root.random", {
	type: "random",
})Can be useful in the handleSubmit method when you want to give error feedback to a user after async validation. (ex: API returns validation errors)
当您希望在异步验证后向用户提供错误反馈时,该 handleSubmit 方法非常有用。(例如:API 返回验证错误)
shouldFocus doesn't work when an input has been disabled.
当输入被禁用时,shouldFocus 它不起作用。
This method will force set isValid formState to false. However, it's important to be aware that isValid will always be derived from the validation result of your input registration rules or schema result.
此方法将强制将 formState 设置为 isValid false 。但是,请务必注意,这将 isValid 始终派生自输入注册规则或架构结果的验证结果。
There are certain keywords that need to be avoided to prevent conflicts with type checking. They are type and types.
需要避免某些关键字,以防止与类型检查发生冲突。它们是 type 和 types .
Examples: 例子:
Single Error 单个错误
import * as React from "react"
import { useForm } from "react-hook-form"

interface FormInputs {
	username: string
}

const App = () => {
	const {
		register,
		handleSubmit,
		setError,
		formState: { errors },
	} = useForm<FormInputs>()
	const onSubmit = (data: FormInputs) => {
		console.log(data)
	}

	React.useEffect(() => {
		setError("username", {
			type: "manual",
			message: "Dont Forget Your Username Should Be Cool!",
		})
	}, [setError])

	return (
		<form onSubmit={handleSubmit(onSubmit)}>
			<input {...register("username")} />
			{errors.username && <p>{errors.username.message}</p>}

			<input type="submit" />
		</form>
	)
}Multiple Errors 多个错误
import * as React from "react"
import { useForm } from "react-hook-form"

interface FormInputs {
	username: string
	firstName: string
}

const App = () => {
	const {
		register,
		handleSubmit,
		setError,
		formState: { errors },
	} = useForm<FormInputs>()

	const onSubmit = (data: FormInputs) => {
		console.log(data)
	}

	return (
		<form onSubmit={handleSubmit(onSubmit)}>
			<label>Username</label>
			<input {...register("username")} />
			{errors.username && <p>{errors.username.message}</p>}
			<label>First Name</label>
			<input {...register("firstName")} />
			{errors.firstName && <p>{errors.firstName.message}</p>}
			<button
				type="button"
				onClick={() => {
					const inputs = [
						{
							type: "manual",
							name: "username",
							message: "Double Check This",
						},
						{
							type: "manual",
							name: "firstName",
							message: "Triple Check This",
						},
					]

					inputs.forEach(({ name, type, message }) => {
						setError(name, { type, message })
					})
				}}
			>
				Trigger Name Errors
			</button>
			<input type="submit" />
		</form>
	)
}Single Field Errors 单字段错误
import * as React from "react"
import { useForm } from "react-hook-form"

interface FormInputs {
	lastName: string
}

const App = () => {
	const {
		register,
		handleSubmit,
		setError,
		formState: { errors },
	} = useForm<FormInputs>({
		criteriaMode: "all",
	})

	const onSubmit = (data: FormInputs) => console.log(data)

	React.useEffect(() => {
		setError("lastName", {
			types: {
				required: "This is required",
				minLength: "This is minLength",
			},
		})
	}, [setValue])

	return (
		<form onSubmit={handleSubmit(onSubmit)}>
			<label>Last Name</label>
			<input {...register("lastName")} />
			{errors.lastName && errors.lastName.types && (
				<p>{errors.lastName.types.required}</p>
			)}
			{errors.lastName && errors.lastName.types && (
				<p>{errors.lastName.types.minLength}</p>
			)}
			<input type="submit" />
		</form>
	)
}Server Error 服务器错误
import * as React from "react";
import { useForm } from "react-hook-form";

const App = () => {
	const { register, handleSubmit, setError, formState: { errors } } = useForm({
		criteriaMode: 'all',
	});
	const onSubmit = async () => {
		const response = await fetch('http://httpbin.org/status/400');
		if (response.statusCode > 200) {
			setError('root.serverError', {
				type: response.statusCode,
			})
		}
	}

	return (
		<form onSubmit={handleSubmit(onSubmit)}>
			<label>Last Name</label>
			<input {...register("lastName")} />

			{errors.root.serverError.type === 400 && <p>server response message</p>}

			<button>submit</button>
		</form>
	);
};clearErrors
clearErrors: (name?: string | string[]) => void 此函数可以手动清除表单中的错误。
Props
undefined: reset all errors undefined :重置所有错误
string: reset the error on a single field or by key name. string :重置单个字段或按键名称的错误。
register("test.firstName", { required: true })
register("test.lastName", { required: true })

clearErrors("test") // will clear both errors from test.firstName and test.lastName
clearErrors("test.firstName") // for clear single input errorstring[]: reset errors on the given fields string[] :重置给定字段的错误
RULES 规则
This will not affect the validation rules attached to each inputs.
这不会影响附加到每个输入的验证规则。
This method doesn't affect validation rules or isValid formState.
此方法不会影响验证规则或 isValid formState。
setValue
setValue: (name: string, value: unknown, config?: Object) => void
This function allows you to dynamically set the value of a registered field and have the options to validate and update the form state. At the same time, it tries to avoid unnecessary rerender.
此函数允许您动态设置已注册字段的值,并具有验证和更新表单状态的选项。同时,它试图避免不必要的重新渲染。
Props
name
按名称定位单个字段
When used with field array. 与字段数组一起使用时
You can use methods such as replace or update for field array, however, they will cause the component to unmount and remount for the targeted field array.
您可以使用诸如 replace or update for 字段数组之类的方法,但是,它们将导致组件卸载并重新挂载目标字段数组。
tsxconst { update } = useFieldArray({ name: 'array' }); // unmount fields and remount with updated value update(0, { test: '1', test1: '2' }) // will directly update input value setValue('array.0.test1', '1'); setValue('array.0.test2', '2');It will not create a new field when targeting a non-existing field.
当定位到不存在的字段时,它不会创建新字段。
tsxconst { replace } = useFieldArray({ name: 'test' }) // ❌ doesn't create new input setValue('test.101.data') // ✅ work on refresh entire field array replace([{ data: 'test' }])
value
- 字段的值。此参数是必需的,不能是 undefined
options
shouldValidate
- 是否计算您的输入是否有效(订阅error)
- 是否计算您的整个表单是否有效
- This option will update touchedFields at the specified field level not the entire form touched fields. 此选项将在指定的字段级别更新,而不是在所触及的整个表单字段进行更新 touchedFields 。
shouldTouch
- 是否将输入本身设置为可触摸。
shouldDirty
- 是否根据 defaultValues(订阅 dirtyFields )计算输入是否脏
- 是否根据 defaultValues(订阅 isDirty )计算整个表单是否脏
- 此选项将在指定的字段级别更新 dirtyFields ,而不是整个表单脏字段。
RULES 规则
Only the following conditions will trigger a re-render:
只有以下条件才会触发重新渲染:
When an error is triggered or corrected by a value update
当错误被值更新触发或更正时
When setValue cause state update, such as dirty and touched.
当 setValue 导致状态更新时,例如脏污和触摸。
It's recommended to target the field's name rather than make the second argument a nested object.
建议以字段的名称为目标,而不是将第二个参数设为嵌套对象。
setValue('yourDetails.firstName', 'value'); // ✅ performant
setValue('yourDetails', { firstName: 'value' }); // less performant

register('nestedValue', { value: { test: 'data' } }); // register a nested value input
setValue('nestedValue.test', 'updatedData'); // ❌ failed to find the relevant field
setValue('nestedValue', { test: 'updatedData' }); // ✅ setValue find input and updateIt's recommended to register the input's name before invoking setValue. To update the entire Field Array, make sure the useFieldArray hook is being executed first.
建议在调用 setValue 之前注册输入的名称。要更新整个 Field Array,请确保首先执行 useFieldArray 钩子。
Important: use replace from useFieldArray instead, update entire field array with setValue will be removed in the next major version.
重要提示:改用 replace from,update useFieldArray entire field array with setValue 将在下一个主要版本中删除。
// you can update an entire Field Array,
setValue('fieldArray', [{ test: '1' }, { test: '2' }]); // ✅

// you can setValue to a unregistered input
setValue('notRegisteredInput', 'value'); // ✅ prefer to be registered

// the following will register a single input (without register invoked)
setValue('resultSingleNestedField', { test: '1', test2: '2' }); // 🤔

// with registered inputs, the setValue will update both inputs correctly.
register('notRegisteredInput.test', '1')
register('notRegisteredInput.test2', '2')
setValue('notRegisteredInput', { test: '1', test2: '2' }); // ✅ sugar syntax to setValue twicesetFocus
setFocus: (name: string, options: SetFocusOptions) => void This method will allow users to programmatically focus on input. Make sure input's ref is registered into the hook form. 此方法将允许用户以编程方式关注输入。确保输入的 ref 已注册到钩子表单中。
Props
name
- A input field name to focus 要关注的输入字段名称
options
- shouldSelect
- Whether to select the input content on focus. 是否选择对焦的输入内容。
RULES 规则
This API will invoke focus method from the ref, so it's important to provide ref during register.
此 API 将从 ref 调用焦点方法,因此请务必在register期间 提供 ref .
Avoid calling setFocus right after reset as all input references will be removed by reset API.
避免在之后 reset 立即调用 setFocus ,因为 reset API 将删除所有输入引用。
import * as React from "react"
import { useForm } from "react-hook-form"

interface FormValues {
	firstName: string
}

export default function App() {
	const { register, handleSubmit, setFocus } = useForm<FormValues>()
	const onSubmit = (data: FormValues) => console.log(data)
	renderCount++

	React.useEffect(() => {
		setFocus("firstName")
	}, [setFocus])

	return (
		<form onSubmit={handleSubmit(onSubmit)}>
			<input {...register("firstName")} placeholder="First Name" />
			<input type="submit" />
		</form>
	)
}getValues
getValues: (payload?: string | string[]) => Object
An optimized helper for reading form values. The difference between watch and getValues is that getValues will not trigger re-renders or subscribe to input changes. 用于读取表单值的优化帮助程序。和 getValues 之间的区别 watch 在于, getValues 它不会触发重新渲染或订阅输入更改。
RULES 规则
Disabled inputs will be returned as undefined. If you want to prevent users from updating the input and still retain the field value, you can use readOnly or disable the entire <fieldset /> 禁用的输入将返回为 undefined 。如果要阻止用户更新输入并仍保留字段值,则可以使用 readOnly 或禁用整个 <fieldset />
它将从 useForm 初始渲染之前返回 defaultValues 。
import * as React from "react";
import { useForm } from "react-hook-form";
import Headers from "./Header";
import "./styles.css";

interface FormValues {
	firstName: string;
	lastName: string;
}

let renderCount = 0;

export default function App() {
	const { register, handleSubmit } = useForm<FormValues>();
	const onSubmit = (data: FormValues) => console.log(data);
	renderCount++;

	return (
		<div>
			<Headers
				renderCount={renderCount}
				description="Performant, flexible and extensible forms with easy-to-use validation."
			/>

			<form onSubmit={handleSubmit(onSubmit)}>
				<input readOnly {...register("firstName")} placeholder="First Name" />
				<fieldset disabled>
					<input {...register("lastName")} placeholder="First Name" />
				</fieldset>
				<input type="submit" />
			</form>
		</div>
	);
}trigger
trigger: (name?: string | string[]) => Promise<boolean>
Manually triggers form or input validation. This method is also useful when you have dependant validation (input validation depends on another input's value).
手动触发表单或输入验证。当您进行依赖验证时,此方法也很有用(输入验证取决于另一个输入的值)
Props
name
- undefined
- string
- string[]
shouldFocus
Should focus the input during setting an error. This only works when the input's reference is registered, it will not ork for custom register as well.
在设置错误时应聚焦输入。这仅在注册了输入的引用时才有效,也不适用于自定义寄存器。
RULES 规则
Isolate render optimisation only applicable for targeting a single field name with string as payload, when supplied with array and undefined to trigger will re-render the entire formState.
隔离渲染优化仅适用于以 string as 有效负载定位单个字段名称,当随 array 和 undefined 触发器一起提供时,将重新渲染整个 formState
control
his object contains methods for registering components into React Hook Form. 此对象包含将组件注册到 React Hook Form 中的方法。
提示
Important: do not access any of the properties inside this object directly. It's for internal usage only.
重要提示:不要直接访问此对象中的任何属性。它仅供内部使用。
register
const { onChange, onBlur, name, ref } = register('firstName');
// include type check against field path with the name you have supplied.

<input
	onChange={onChange} // assign onChange event
	onBlur={onBlur} // assign onBlur event
	name={name} // assign name prop
	ref={ref} // assign ref prop
/>
// same as above
<input {...register('firstName')} />Options 选项
- validate
- Function | Object
- You can pass a callback function as the argument to validate, or you can pass an object of callback functions to validate all of them. This function will be executed on its own without depending on other validation rules included in the required attribute.
- 您可以传递回调函数作为要验证的参数,也可以传递回调函数的对象来验证所有回调函数。此函数将自行执行,而不依赖于属性中包含的 required 其他验证规则。
- Note: for object or array input data, it's recommended to use the validate function for validation as the other rules mostly apply to string, string[], number and boolean data types.
- 注意:对于 object 或 array 输入数据,建议使用该 validate 函数进行验证,因为其他规则主要适用于 string 、 string[] number 和 boolean 数据类型。
<input
	{...register("test", {
		validate: value => value === '1' || 'error message'  // JS only: <p>error message</p> TS only support string
	})}
/>
// object of callback functions
<input
	{...register("test1", {
		validate: {
			positive: v => parseInt(v) > 0 || 'should be greater than 0',
			lessThanTen: v => parseInt(v) < 10 || 'should be lower than 10',
			validateNumber: (_: number, formValues: FormValues) => {
				return formValues.number1 + formValues.number2 === 3 || 'Check sum number';
			},
			// you can do asynchronous validation as well
			checkUrl: async () => await fetch() || 'error message',  // JS only: <p>error message</p> TS only support string
			messages: v => !v && ['test', 'test2']
		}
	})}
/>::: Rules 规则 name is required and unique (except native radio and checkbox). Input name supports both dot and bracket syntax, which allows you to easily create nested form fields.
name 是必需的且唯一的。输入名称支持点和括号语法,这使您可以轻松创建嵌套表单字段。
name can neither start with a number nor use number as key name. Please avoid special characters as well.
name 既不能以数字开头,也不能使用数字作为键名。也请避免使用特殊字符。
we are using dot syntax only for typescript usage consistency, so bracket[] will not work for array form value.
我们仅使用点语法来保持一致的typescript使用,因此括号 []不适用于数组表单值
register('test.0.firstName'); // ✅
register('test[0]firstName'); // ❌disabled input will result in an undefined form value. If you want to prevent users from updating the input, you can use readOnly or disable the entire <fieldset />
disabled input 将生成一个 undefined 表单值。如果要阻止用户更新输入,可以使用 readOnly 或禁用整个 <fieldset />
To produce an array of fields, input names should be followed by a dot and number. For example: test.0.data 若要生成字段数组,输入名称后应后跟 adot 和 number。例如: test.0.data
Changing the name on each render will result in new inputs being registered. It's recommended to keep static names for each registered input.
更改每个渲染上的名称将导致注册新的输入。建议保留每个已注册输入的静态名称。
:::
Tips 技巧 Custom Register 自定义寄存器
You can also register inputs with useEffect and treat them as virtual inputs. For controlled components, we provide a custom hook useController and Controller component to take care this process for you.
您还可以 register 使用 useEffect 虚拟输入进行输入,并将它们视为虚拟输入。 对于受控组件,我们提供了一个自定义的钩子 useController 和 Controller 组件来为您处理此过程。
If you choose to manually register fields, you will need to update the input value with setValue.
如果选择手动注册字段,则需要使用 setValue 更新输入值。
register('firstName', { required: true, min: 8 });

<TextInput onTextChange={(value) => setValue('lastChange', value))} />useFormContext
此自定义hook允许您访问表单上下文。 useFormContext 旨在用于深度嵌套的结构,在这些结构中,将上下文作为属性传递会变得不方便。
const methods = useForm()

<FormProvider {...methods} /> // all the useForm return props

const methods = useFormContext() // retrieve those props提示
您需要用 FormProvider 组件包装表单 useFormContext 才能正常工作。
import React from "react"
import { FormProvider, useForm, useFormContext } from "react-hook-form"

export default function App() {
	const methods = useForm()
	const onSubmit = (data) => console.log(data)

	return (
		<FormProvider {...methods}>
			// pass all methods into the context
			<form onSubmit={methods.handleSubmit(onSubmit)}>
				<NestedInput />
				<input type="submit" />
			</form>
		</FormProvider>
	)
}


function NestedInput() {
	const { register } = useFormContext() // retrieve all hook methods
	return <input {...register("test")} />
}useController
useController:(props?: UseControllerProps) => { field: object, fieldState: object, formState: object }
This custom hook powers Controller. Additionally, it shares the same props and methods as Controller. It's useful for creating reusable Controlled input. 这个自定义钩子提供 Controller .此外,它与 Controller 共享相同的 props 和方法 。它对于创建可重用的受控输入很有用。
Tips 技巧
It's important to be aware of each prop's responsibility when working with external controlled components, such as MUI, AntD, Chakra UI. Its job is to spy on the input, report, and set its value.
在使用外部控制组件(如 MUI、AntD、Chakra UI)时,了解每个Prop 的责任非常重要。它的工作是监视输入、报告并设置其值。
onChange: send data back to hook form onChange:将数据发送回钩子表单
onBlur: report input has been interacted (focus and blur) onBlur:报表输入已交互(焦点和模糊)
value: set up input initial and updated value 值:设置输入初始值和更新值
ref: allow input to be focused with error ref:允许输入聚焦并出现错误
name: give input an unique name name:为输入指定唯一名称
const { field } = useController();
const [value, setValue] = useState(field.value);

onChange={(event) => {
  field.onChange(parseInt(event.target.value)) // data send back to hook form
  setValue(event.target.value) // UI state
}}Do not register input again. This custom hook is designed to take care of the registration process. 不要再次 register 输入框。此自定义钩子旨在处理注册过程。
const { field } = useController({ name: 'test' })

<input {...field} /> // ✅
<input {...field} {...register('test')} /> // ❌ double up the registrationIt's ideal to use a single useController per component. If you need to use more than one, make sure you rename the prop. May want to consider using Controller instead. 每个组件使用一个 useController 是理想的选择。如果需要使用多个,请确保重命名Prop。可能需要考虑改用 Controller 。
const { field: input } = useController({ name: 'test' })
const { field: checkbox } = useController({ name: 'test1' })


<input {...input} />
<input {...checkbox} />Controller
React Hook Form embraces uncontrolled components and native inputs, however it's hard to avoid working with external controlled component such as React-Select, AntD and MUI. This wrapper component will make it easier for you to work with them.
React Hook Form 包含不受控制的组件和原生输入,但很难避免使用外部受控组件,例如 React-Select、AntD 和 MUI。这个包装器组件将使你更容易使用它们
Examples: 例子
import ReactDatePicker from "react-datepicker"
import { TextField } from "@material-ui/core"
import { Controller, useForm } from "react-hook-form"

interface FormValues {
	ReactDatepicker: string
}

function App() {
	const { handleSubmit, control } = useForm<FormValues>()

	return (
		<form onSubmit={handleSubmit((data) => console.log(data))}>
			<Controller
				control={control}
				name="ReactDatepicker"
				render={({ field: { onChange, onBlur, value, ref } }) => (
					<ReactDatePicker
						onChange={onChange} // send value to hook form
						onBlur={onBlur} // notify when input is touched/blur
						selected={value}
					/>
				)}
			/>
			<input type="submit" />
		</form>
	)
}提示
It's important to be aware of each prop's responsibility when working with external controlled components, such as MUI, AntD, Chakra UI. Controller acts as a "spy" on your input by reporting and setting value. 在使用外部控制组件(如 MUI、AntD、Chakra UI)时,了解每个Prop的责任非常重要。控制器通过报告和设置值充当输入的“间谍”。
onChange: send data back to hook form onChange:将数据发送回钩子表单
onBlur: report input has been interacted (focus and blur) onBlur:报表输入已交互(焦点和模糊)
value: set up input initial and updated value 值:设置输入初始值和更新值
ref: allow input to be focused with error ref:允许输入聚焦并出现错误
name: give input an unique name The following codesandbox demonstrate the usages: name:给输入一个唯一的名称
AntD使用
import * as React from "react";
import { Controller } from "react-hook-form";
import {
	Checkbox as AntdCheckbox,
	Slider as AntdSlider,
	Switch as AntdSwitch,
	Input,
	Radio,
	Select
} from "antd";

const { Option } = Select;

export default ({ control }) => (
	<div className="container">
		<section>
			<label>Antd Input 输入框</label>
			<Controller
				placeholder="AntD Input"
				control={control}
				name="AntdInput"
				render={({ field }) => <Input {...field} />}
			/>
		</section>

		<section>
			<label>Antd Checkbox 复选框</label>
			<Controller
				control={control}
				name="AntdCheckbox"
				render={({ field: { value, onChange } }) => (
					<AntdCheckbox
						checked={value}
						onChange={(e) => {
							onChange(e.target.checked);
						}}
					/>
				)}
			/>
		</section>

		<section>
			<label>Antd Switch 开关</label>
			<Controller
				control={control}
				name="AntdSwitch"
				render={({ field: { value, onChange } }) => (
					<AntdSwitch onChange={onChange} checked={value} />
				)}
			/>
		</section>

		<section>
			<label>Antd Select 下拉框</label>
			<Controller
				control={control}
				name="AntdSelect"
				render={({ field }) => (
					<Select {...field} defaultValue="lucy">
						<Option value="jack">Jack</Option>
						<Option value="lucy">Lucy</Option>
						<Option value="Yiminghe">yiminghe</Option>
					</Select>
				)}
			/>
		</section>

		<section>
			<label>Antd Slider 滑动块</label>
			<Controller
				control={control}
				name="AntdSlider"
				render={({ field }) => <AntdSlider {...field} />}
			/>
		</section>

		<section>
			<label>Antd Radio 单选钮</label>
			<Controller
				control={control}
				name="AntdRadio"
				render={({ field: { onChange, value } }) => (
					<Radio.Group value={value} onChange={(e) => onChange(e.target.value)}>
						<Radio value={1}>A</Radio>
						<Radio value={2}>B</Radio>
						<Radio value={3}>C</Radio>
						<Radio value={4}>D</Radio>
					</Radio.Group>
				)}
			/>
		</section>
	</div>
);MUI使用
import * as React from "react";
import { Controller } from "react-hook-form";
import DateFnsUtils from "@date-io/date-fns";
import {
	Checkbox,
	FormControlLabel,
	MenuItem,
	Radio,
	RadioGroup,
	Select,
	Slider,
	Switch,
	TextField,
	ThemeProvider,
	createMuiTheme
} from "@material-ui/core";
import {
	KeyboardDatePicker,
	MuiPickersUtilsProvider
} from "@material-ui/pickers";
import MuiAutoComplete from "./MuiAutoComplete";

const theme = createMuiTheme({
	palette: {
		type: "dark"
	}
});

export default ({ control }) => (
	<ThemeProvider theme={theme}>
		<div className="container">
			<section>
				<label>MUI Picker</label>
				<MuiPickersUtilsProvider utils={DateFnsUtils}>
					<Controller
						name="MUIPicker"
						control={control}
						render={({ field: { ref, ...rest } }) => (
							<KeyboardDatePicker
								margin="normal"
								id="date-picker-dialog"
								label="Date picker dialog"
								format="MM/dd/yyyy"
								KeyboardButtonProps={{
									"aria-label": "change date"
								}}
								{...rest}
							/>
						)}
					/>
				</MuiPickersUtilsProvider>
			</section>

			<section>
				<label>MUI Checkbox</label>
				<Controller
					name="Checkbox"
					control={control}
					render={({ field }) => (
						<Checkbox
							onChange={(e) => field.onChange(e.target.checked)}
							checked={field.value}
						/>
					)}
				/>
			</section>

			<section>
				<label>Radio Group</label>
				<Controller
					render={({ field }) => (
						<RadioGroup aria-label="gender" {...field}>
							<FormControlLabel
								value="female"
								control={<Radio />}
								label="Female"
							/>
							<FormControlLabel value="male" control={<Radio />} label="Male" />
						</RadioGroup>
					)}
					name="RadioGroup"
					control={control}
				/>
			</section>

			<section>
				<label>MUI TextField</label>
				<Controller
					render={({ field }) => <TextField {...field} />}
					name="TextField"
					control={control}
				/>
			</section>

			<section>
				<label>MUI Select</label>
				<Controller
					render={({ field }) => (
						<Select {...field}>
							<MenuItem value={10}>Ten</MenuItem>
							<MenuItem value={20}>Twenty</MenuItem>
							<MenuItem value={30}>Thirty</MenuItem>
						</Select>
					)}
					name="Select"
					control={control}
				/>
			</section>

			<section>
				<label>MUI Switch</label>
				<Controller
					name="switch"
					control={control}
					render={({ field }) => (
						<Switch
							onChange={(e) => field.onChange(e.target.checked)}
							checked={field.value}
						/>
					)}
				/>
			</section>

			<section>
				<label>MUI Slider</label>
				<Controller
					name="MUI_Slider"
					control={control}
					defaultValue={[0, 10]}
					render={({ field }) => (
						<Slider
							{...field}
							onChange={(_, value) => {
								field.onChange(value);
							}}
							valueLabelDisplay="auto"
							max={10}
							step={1}
						/>
					)}
				/>
			</section>

			{/* <section>
        <label>MUI autocomplete</label>
        <MuiAutoComplete control={control} />
      </section> */}
		</div>
	</ThemeProvider>
);Do not register input again. This component is made to take care of the registration process. 不要 再次 register 输入框。此组件用于处理注册过程。
<Controller
	name="test"
	render={({ field }) => {
		// return <input {...field} {...register('test')} />; ❌ double up the registration
		return <input {...field} /> // ✅
	}}
/>Customise what value gets sent to hook form by transforming the value during onChange. 在 onChange 期间 通过 转换值 来自定义 发送到hook form的值。
<Controller
	name="test"
	render={({ field }) => {
		// sending integer instead of string.
		return (
			<input
				{...field}
				onChange={(e) => field.onChange(parseInt(e.target.value))}
			/>
		)
	}}
/>Props 参数(属性)
name
- 输入的唯一名称
control
- control object is from invoking useForm. Optional when using FormProvider.
- control 对象来自调用 useForm 。使用 FormProvider 时可选。
render
- render prop or children function which provides object containing field, fieldState, formState, and form methods.
- 提供包含 field、fieldState、formState 和 form 方法的对象的 render
- 它返回一个 React 元素,并提供将事件和值附加到组件中的能力
- 为子组件提供 onChange 、 onBlur 、 name ref 和 value ,以及包含特定输入状态的 fieldState 对象。
defaultValue
- Important: Can not apply undefined to defaultValue or defaultValues at useForm.
- 重要提示:不能应用 undefined 于 defaultValue 或 useForm中的 defaultValues 。
- If your form will invoke reset with default values, you will need to provide useForm with defaultValues.
- 如果表单将 reset 使用默认值进行调用,则需要提供 useForm defaultValues .
- Calling onChange with undefined is not valid. You should use null or the empty string as your default/cleared value instead.
- undefined 调用 onChange 方式 无效。您应该改用 null 或 空字符串作为默认值/清除值。
rules
- Object 对象
- Validation rules in the same format for register options, which includes:
- required, min, max, minLength, maxLength, pattern, validate
shouldUnregister
- boolean = false
- Input will be unregistered after unmount and defaultValues will be removed as well.
- 卸载后,输入将被取消注册,defaultValues 也将被删除。
- 注意:当使用 useFieldArray 时,应避免使用此Prop,因为在 unregister 输入卸载/重新安装和重新排序后调用函数。
disabled
- disabled prop will be returned from field prop. Controlled input will be disabled and its value will be omitted from the submission data.
- disabled prop 将从 field prop 返回。受控输入将被禁用,其值将从提交数据中省略。
Return 返回值
field
onChange
- (value: any) => void
- A function which sends the input's value to the library.
- 将输入值发送到库的函数
- It should be assigned to the onChange prop of the input and value should not be undefined.
- 它应该分配给输入框的 onChange prop,而 value 不应该是 undefined
- This prop update formState and you should avoid manually invoke setValue or other API related to field update.
- 此 prop 会更新 formState,您应避免手动调用 setValue 或其他与字段更新相关的 API
onBlur
- () => void
- 将输入的 onBlur 事件发送到库的函数。它应该分配给输入框的 onBlur prop。
value
- unknown 未知
- 受控组件的当前值。
disabled
- 输入的禁用状态。
name
- 正在注册的输入名称。
ref
- React.ref
- A ref used to connect hook form to the input.
- Assign ref to component's input ref to allow hook form to focus the error input.
- 用于将挂钩表单连接到输入的 ref。分配 ref 给组件的输入框的 ref 以允许钩子表单聚焦错误输入
fieldState
error
- object 对象
- error for this specific input.
- 此特定输入框的错误。
invalid
- boolean
- 当前输入的状态无效
isTouched
- Touched state for current controlled input
- 当前受控输入的(是否被)触摸状态
isDirty
- Dirty state for current controlled input.
- 当前受控输入的脏状态(是否被修改)
formState
isDirty
- Set to true after the user modifies any of the inputs.
- 在用户修改任何输入后设置为 true
- Important: Make sure to provide all inputs' defaultValues at the useForm, so hook form can have a single source of truth to compare whether the form is dirty.
- 重要提示:请确保在 useForm 中提供所有输入的 defaultValues,以便钩子表单可以有一个单一的事实来源来比较表单是否脏。
- File typed input will need to be managed at the app level due to the ability to cancel file selection and FileList object.
- 由于能够取消文件选择和 FileList 对象,因此需要在应用级别管理文件类型输入。
dirtyFields
- object 对象
- An object with the user-modified fields. Make sure to provide all inputs' defaultValues via useForm, so the library can compare against the defaultValues
- 具有用户修改字段的对象。确保通过 useForm 提供所有输入的 defaultValues,以便库可以与 defaultValues
- Dirty fields will not represent as isDirty formState, because dirty fields are marked field dirty at field level rather the entire form. If you want to determine the entire form state use isDirty instead.
- 脏字段不会表示为 isDirty formState,因为脏字段是在字段级别标记为脏字段,而不是整个表单。如果要确定整个表单状态,请使用 isDirty。
touchedFields
- An object containing all the inputs the user has interacted with.
- 一个对象,包含用户与之交互的所有输入框。
defaultValues
- The value which has been set at useForm's defaultValues or updated defaultValues via reset API.
- 已在 useForm 的 defaultValues 或通过 reset API 更新的 defaultValues 设置的值。
isSubmitted
- Set to true after the form is submitted.
- 在表单提交后设置为 true。
- 将一直保留 true ,直到调用该 reset 方法。
isSubmitSuccessful
- Indicate the form was successfully submitted without any runtime error.
- 指示表单已成功提交,没有任何运行时错误。
submitCount
- 表单提交的次数。
isValid
- Set to true if the form doesn't have any errors.
- 如果窗体没有任何错误,则设置为此。 true
- setError has no effect on isValid formState, isValid will always derived via the entire form validation result.
- setError 对 isValid 表单状态 没有影响, isValid 将始终通过整个表单验证结果派生。
errors
- object 对象
- An object with field errors. There is also an ErrorMessage component to retrieve error message easily.
- 具有字段错误的对象。还有一个 ErrorMessage 组件可以轻松检索错误消息。
FormProvider
此组件将托管上下文对象,并允许使用组件订阅上下文并使用 useForm 属性和方法。 FormProvider 需要所有 useForm 方法
提示
Avoid using nested FormProvider
避免使用嵌套的 FormProvider
import React from "react"

import { FormProvider, useForm, useFormContext } from "react-hook-form"

export default function App() {
	const methods = useForm()

	const onSubmit = (data) => console.log(data)

	return (
		<FormProvider {...methods}>
			// pass all methods into the context
			<form onSubmit={methods.handleSubmit(onSubmit)}>
				<NestedInput />
				<input type="submit" />
			</form>
		</FormProvider>
	)
}

function NestedInput() {
	const { register } = useFormContext() // retrieve all hook methods

	return <input {...register("test")} />
}useWatch
行为与 watch API 类似,但是,这将隔离自定义挂钩级别的重新render,并可能为您的应用程序带来更好的性能。
Examples: 例子
import React from "react"
import { useForm, useWatch } from "react-hook-form"

interface FormInputs {
	firstName: string
	lastName: string
}

function FirstNameWatched({ control }: { control: Control<FormInputs> }) {
	const firstName = useWatch({
		control,
		name: "firstName", // without supply name will watch the entire form, or ['firstName', 'lastName'] to watch both
		// 如果没有输入名称,将查看整个表单,或者['firstName', 'lastName']查看两个表单
		defaultValue: "default", // default value before the render 渲染前的默认值
	})

	return <p>Watch: {firstName}</p> // only re-render at the custom hook level, when firstName changes 当firstName改变时,只在自定义钩子级别重新呈现
}


function App() {
	const { register, control, handleSubmit } = useForm<FormInputs>()

	const onSubmit = (data: FormInputs) => {
		console.log(data)
	}

	return (
		<form onSubmit={handleSubmit(onSubmit)}>
			<label>First Name:</label>
			<input {...register("firstName")} />
			<input {...register("lastName")} />
			<input type="submit" />

			<FirstNameWatched control={control} />
		</form>
	)
}Advanced Field Array 高级字段阵列
import React from "react"
import { useWatch } from "react-hook-form"

function totalCal(results) {
	let totalValue = 0

	for (const key in results) {
		for (const value in results[key]) {
			if (typeof results[key][value] === "string") {
				const output = parseInt(results[key][value], 10)
				totalValue = totalValue + (Number.isNaN(output) ? 0 : output)
			} else {
				totalValue = totalValue + totalCal(results[key][value], totalValue)
			}
		}
	}

	return totalValue
}

export const Calc = ({ control, setValue }) => {
	const results = useWatch({ control, name: "test" })
	const output = totalCal(results)

	// isolated re-render to calc the result with Field Array
	// 独立的重新渲染,以计算结果与字段数组
	console.log(results)

	setValue("total", output)

	return <p>{output}</p>
}Props
name
- string | string[] | undefined
- Name of the field. 字段的名称
- 如果没有输入名称,将查看整个表单,或者['firstName', 'lastName']查看两个表单
control
- control 对象由 useForm 提供。如果使用 FormContext,则这是可选的
defaultValue
- default value for useWatch to return before the initial render.
- useWatch 在初始渲染之前返回的默认值。
disabled
- 禁用订阅的选项
exact
- boolean = false
- this prop will enable an exact match for input name subscriptions.
- 此prop将为输入框名称订阅启用完全精确的匹配。
Return
useWatch({ name: 'inputName' }) unknown
useWatch({ name: ['inputName1'] }) unknown[]
useWatch()
RULES 规则
The initial return value from useWatch will always return what's inside of defaultValue or defaultValues from useForm.
来自 useWatch 的 初始返回值, 将始终返回 defaultValue 或 useForm中 defaultValues 的内容 。
The only difference between useWatch and watch is at the root (useForm) level or the custom hook level update.
和 watch 之间的 useWatch 唯一区别在于根 ( useForm ) 级别或自定义挂钩级别更新。
useWatch's execution order matters, which means if you update a form value before the subscription is in place, then the value updated will be ignored.
useWatch 的执行顺序很重要,这意味着如果在订阅之前更新表单值,则更新的值将被忽略。
先watch然后再setValue!!!
setValue("test", "data")
useWatch({ name: "test" }) // ❌ subscription is happened after value update, no update received

useWatch({ name: "example" }) // ✅ input value update will be received and trigger re-render
setValue("example", "data")You can overcome the above issue with a simple custom hook as below:
您可以使用简单的自定义钩子来克服上述问题,如下所示:
const useFormValues = () => {
	const { getValues } = useFormContext()

	return {
		...useWatch(), // subscribe to form value updates
		...getValues(), // always merge with latest form values
	}
}useWatch's result is optimised for render phase instead of useEffect's deps, to detect value updates you may want to use an external custom hook for value comparison.
useWatch 的结果针对渲染阶段 useEffect 而不是 的 deps 进行了优化,为了检测值更新,您可能需要使用外部自定义钩子进行值比较。
useFormState
订阅表单状态更新
This custom hook allows you to subscribe to each form state, and isolate the re-render at the custom hook level. It has its scope in terms of form state subscription, so it would not affect other useFormState and useForm. Using this hook can reduce the re-render impact on large and complex form application.
此自定义钩子允许您订阅每个表单状态,并在自定义钩子级别隔离重新呈现。 它在表单状态订阅方面有其作用域,因此它不会影响其他 useFormState 和 useForm。 使用此挂钩可以减少对大型复杂表单应用程序的重新渲染影响
提示
Returned formState is wrapped with Proxy to improve render performance and skip extra computation if specific state is not subscribed, so make sure you deconstruct or read it before render in order to enable the subscription.
返回的 Proxy formState 包装在一起,以提高渲染性能,并在未订阅特定状态时跳过额外的计算,因此请确保在渲染之前解构或读取它以启用订阅。
const { isDirty } = useFormState(); // ✅
const formState = useFormState(); // ❌ should deconstruct the formStateExamples 例子
import * as React from "react";
import { useForm, useFormState } from "react-hook-form";

function Child({ control }) {
	const { dirtyFields } = useFormState({
		control
	});

	return dirtyFields.firstName ? <p>Field is dirty.</p> : null;
};

export default function App() {
	const { register, handleSubmit, control } = useForm({
		defaultValues: {
			firstName: "firstName"
		}
	});
	const onSubmit = (data) => console.log(data);

	return (
		<form onSubmit={handleSubmit(onSubmit)}>
			<input {...register("firstName")} placeholder="First Name" />
			<Child control={control} />


			<input type="submit" />
		</form>
	);
}与三方UI组件共用的demo
在
validationSchema中定义全部校验规则,而在FormItem中仅保留必要的布局和样式,避免重复声明校验规则Ant Design 的
Form组件期望的form属性应该是FormInstance类型,而react-hook-form的control并不是完全一致的类型。 在这种情况下,你需要确保react-hook-form与Ant Design的Form组件可以兼容。通常,我们会借助Controller组件来桥接这两个库。如果你正在混合使用Ant Design的
Form和react-hook-form,确保遵循正确的用法。 所有需要受控的表单元素都应当包裹在Controller组件内,而不是直接将control传递给Ant Design的Form组件。
Antd、react-hook-form、yup
import React, { ReactNode } from 'react';
import { Button, Form, Input, InputNumber } from 'antd';
import { useForm } from 'react-hook-form';
import * as yup from 'yup';

const FormItem = Form.Item;

interface Props {
	label: string;
	error: any;
	children: any;
}

function InputField(props: Props) {
	const { label, error, children } = props;
	return (
		<FormItem
			label={label}
			validateStatus={error ? 'error' : ''}
			help={error ? error.message : ''}
			hasFeedback
		>
			{children}
		</FormItem>
	);
}

export default () => {
	const schema = yup.object().shape({
		name: yup.string().required('name不能为空'),
		age: yup
			.number()
			.required('age不能为空')
			.min(10, '最小是10'),
	});

	const {
		register,
		handleSubmit,
		errors,
		setValue,
		watch,
		triggerValidation,
	} = useForm({
		validationSchema: schema,
	});

	const onSubmit = (data: any) => {
		console.log(data);
	};

	const handleSetValue = (field: string, val: any) => {
		setValue(field, val);
		triggerValidation(field);
	};

	React.useEffect(() => {
		register({ name: 'name' });
		register({ name: 'city' });
		register({ name: 'age' });
	}, [register]);

	return (
		<div>
			<h1>antd react-hook-form yup</h1>
			<form onSubmit={handleSubmit(onSubmit)}>
				<InputField label="姓名" error={errors.name}>
					<Input
						name="name"
						onChange={e => handleSetValue('name', e.target.value)}
					/>
				</InputField>

				<InputField label={'年纪'} error={errors.age}>
					<InputNumber
						name="age"
						onChange={val => handleSetValue('age', val)}
					/>
				</InputField>

				<InputField label="城市" error={errors.city}>
					<Input
						name="city"
						onChange={e => handleSetValue('city', e.target.value)}
					/>
				</InputField>

				<Button type="primary" htmlType="submit">
					Submit
				</Button>
			</form>
		</div>
	);
};Contributors
 Long Mo